


I’ve been dreaming of having the ability to write this post for what feels like years…so I’m SO excited to reveal my One Room Challenge Budget Friendly Kitchen Renovation with you today! I shared a video walk through shortly before Christmas, but I wanted to reset the space with fresh styling before snapping more photos. So without further ado…
Deciding on a full kitchen gut vs a budget friendly kitchen renovation
While many of you watched this transformation take place over the course of two months on instagram, the kitchen renovation has been happening in my mind for nearly four years. I wrestled with whether I should gut the entire room, or if I was capable of transforming the existing space into something I could actually love. It was a real conundrum. What could the kitchen be like if I moved things around? Could it function better? Would my pain points be resolved? What are my paint points? Can I solve my pain points without spending tens of thousands of dollars?
It was that last question that made me stop spinning. What are my paint points? I wrote them down: Running out of storage, cold and sterile feeling, dated, doesn’t flow with other rooms, blind corners in cabinets, ugly exposed hinges. Do you see where I’m going here? After I sat down and really looked at my issues, I realized I could fix most of them myself.

The color scheme
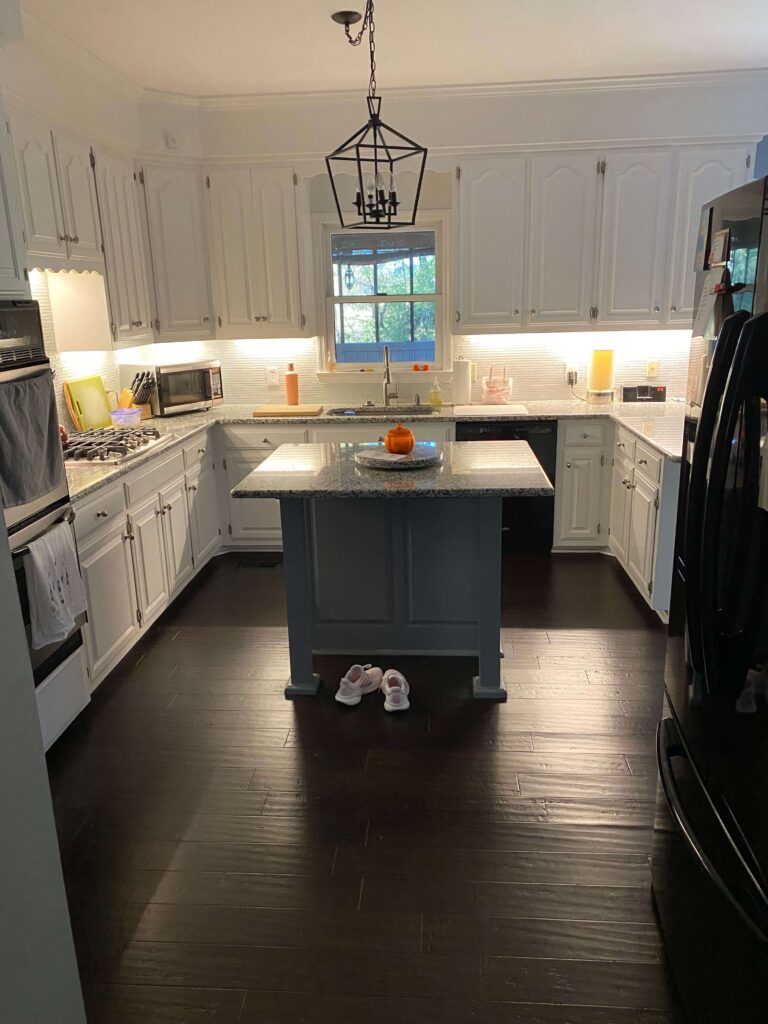
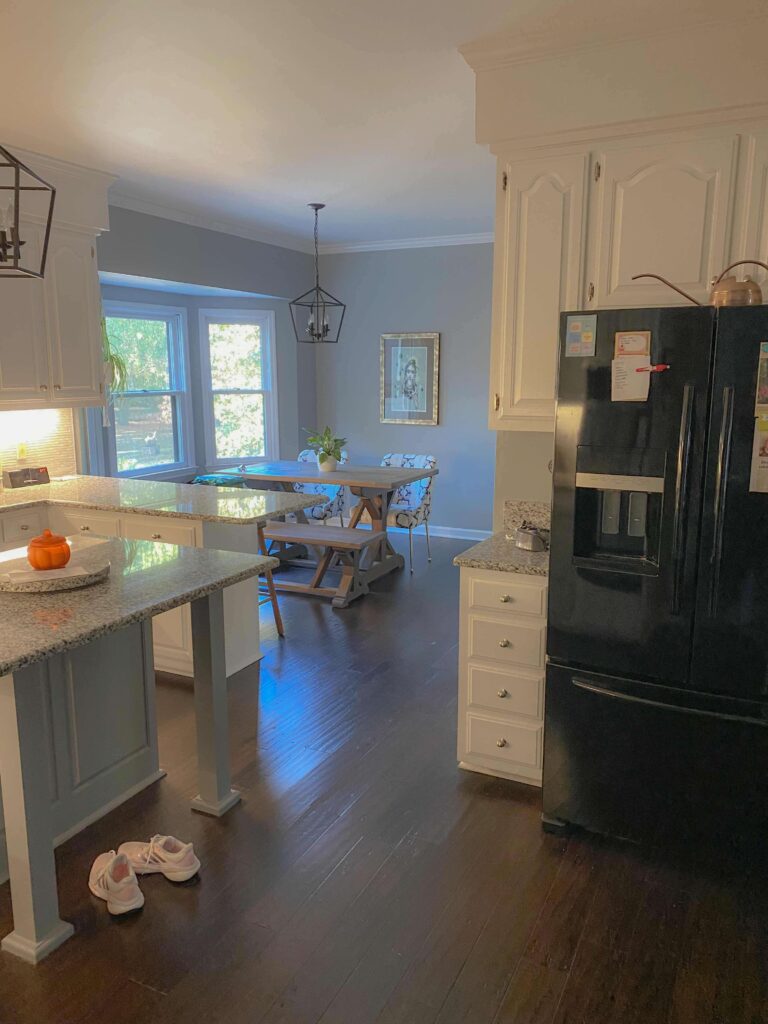
When I look at the before photos of the kitchen, I don’t even recognize it. It was incredibly cold and sterile. Even after I installed the new white oak hardwood flooring and painted the walls a creamy white, it was still reading cold.
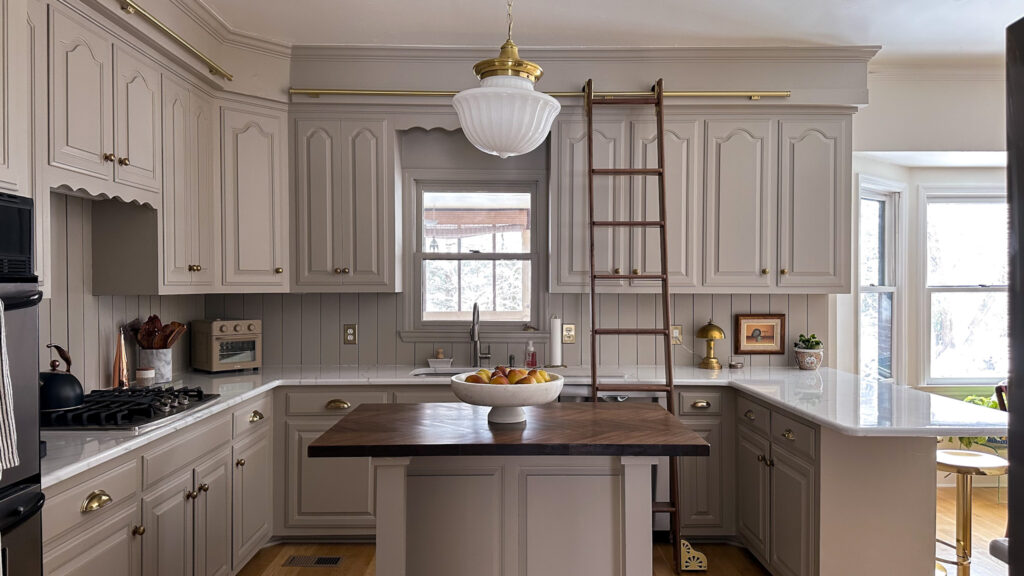
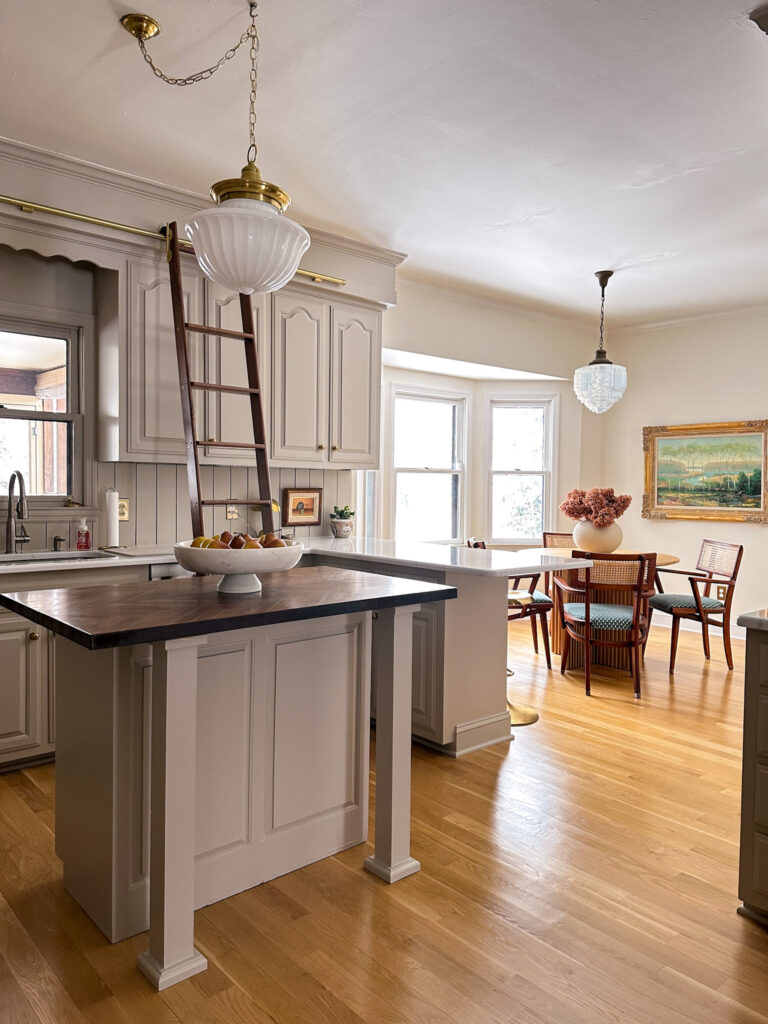
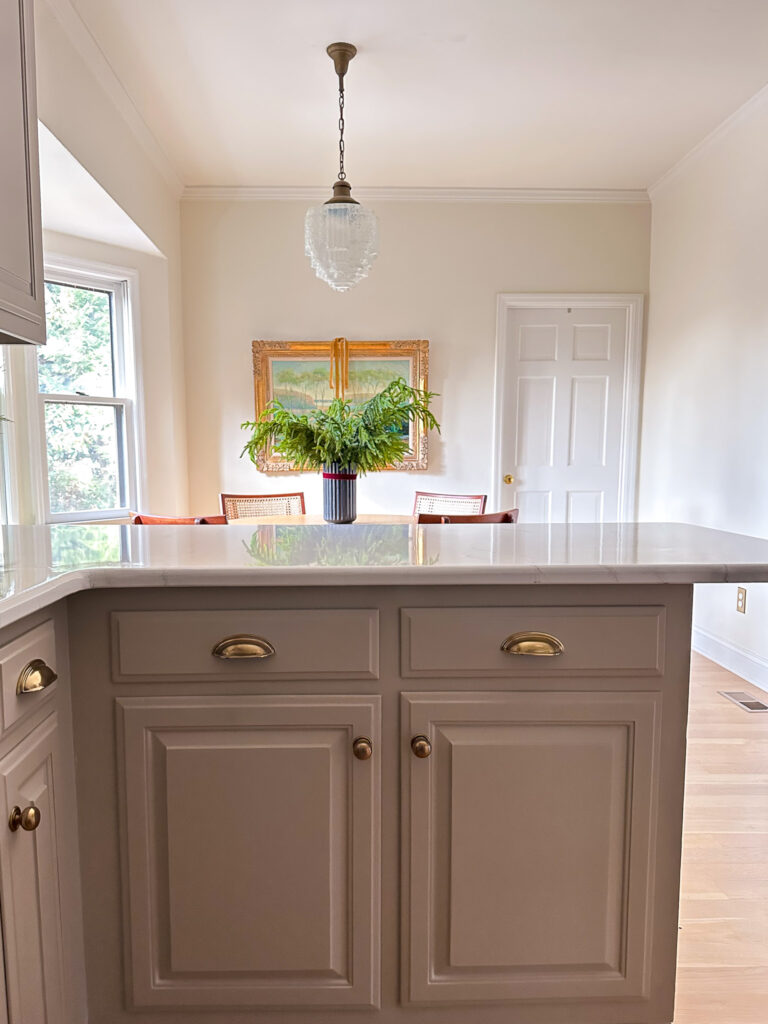
In my initial design plan for the budget friendly kitchen renovation, I knew that the color palette was going to be everything. When thinking about a color scheme, I quickly decided on a warm taupe for both the cabinets and wood paneled backsplash. It would be enough of a contrast with the existing cream walls, as well as against the marble countertops I planned to create, but would warm up the space and not stand out like a sore thumb.
After browsing beiges and taupes for weeks, I picked up a sample of Stone Hearth by Benjamin Moore and it was love at first paint stroke. To get a professional finish on the cabinets I opted to learn how to use a paint sprayer for the first time and it was the best decision I could have made. You can read all about the process and everything I used in my blog post here.
Transforming the countertops
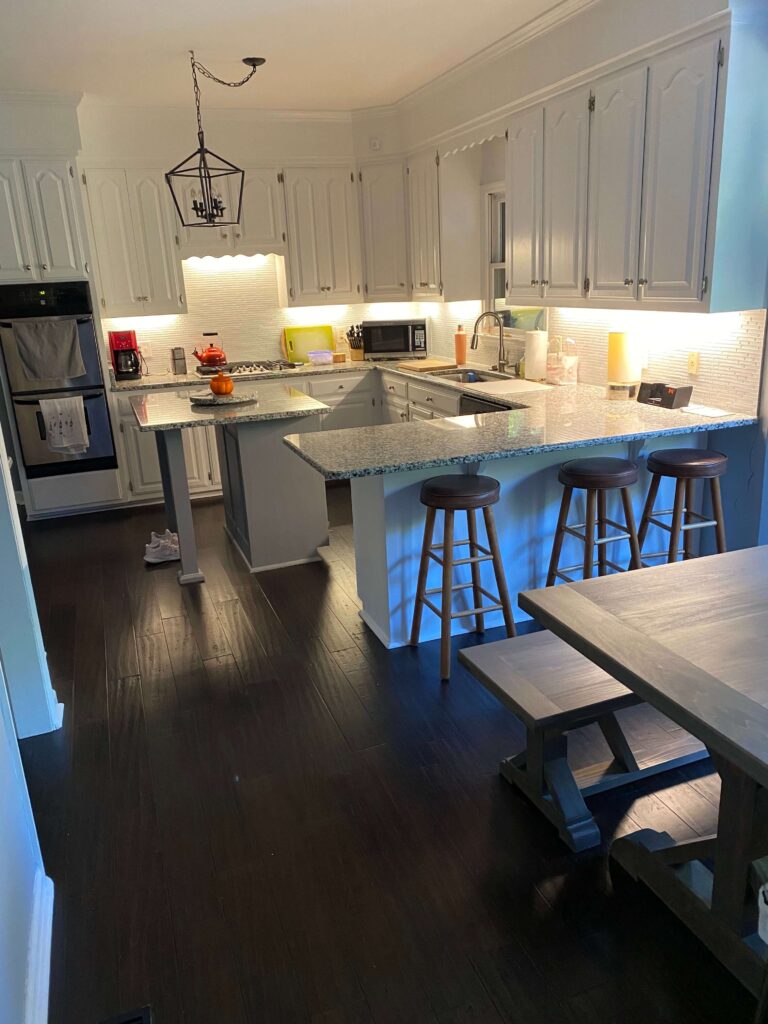
The thing I hated the most about my original kitchen was the dark speckled granite countertops. Don’t get me wrong, I was super thankful to have inherited real stone vs a laminate counter, but I despised the coloring. It was cold, dark, had exposed seams and the worst part: you couldn’t see crumbs unless you got eye level with the counters. Listen, I like a clean house, ok? We all have our things.
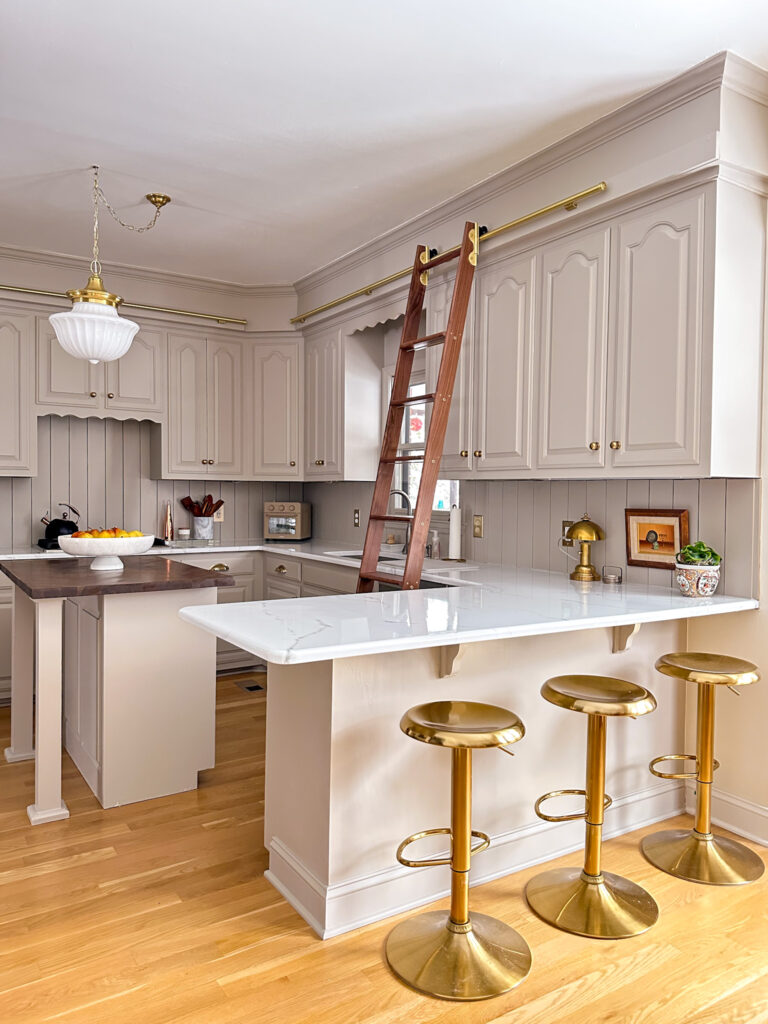
In my dream world, this would have been the part where I brought in a slab of Italian Marble and had real marble countertops (and an extending marble backsplash) ; however I don’t have buckets of money hiding in my basement. So since I didn’t have $10k in the budget for counters, I did the next best thing: I painted my countertops to look like marble!
I realize there are some skeptics out there, and I totally get that. I had my own hesitations too. But after watching many hours of videos, reading tons of reviews and doing my own research, I decided to go for it and used this kit by Giani. If you’re curious to learn more, I share the play by play of the entire process from start to finish in this blog post. I think the photos speak for themselves, but I’ll also share that the countertops have received the most “wow’s” from anyone that’s set foot in my kitchen since the renovation!
Marble Countertop Kit | Brass Bar Stools | Brass Desk Lamp | Milk Glass Pendant
Form Meets Function
I’ve always believed the devil is in the details. I can slap paint on just about anything to make it look pretty, but it also has to feel pretty in order to feel updated. Squeaky cabinet doors and rickety drawers do not scream “upgraded” to me, so another large part of this kitchen renovation was updating the functioning hardware.
The drawer slides were the first project, mostly because there were less of them (12 to be exact). The first couple drawers were not easy, but after I got the hang of it they started falling into place quicker. I share step by step instructions as well as some really essential tools for this project in my blog post here. Definitely check it out if you’re thinking about attempting this!
Then it was time for the door hinges. I was DREADING this. Since my cabinets are older, they have what’s called a lipped opening. This is when the frame of the cabinet isn’t flush against the side. Because of this design, I needed a very specific hinge and there is exactly one option on the market. This also requires blind drilling into the cabinet frame, which was a little scary, but again, after a couple doors I got the hang of it. The result is the perfect soft close door, without any exposed hinges. I think this might be my favorite update of the entire flip! If you have a similar set up and are wanting to upgrade your hinges, you can watch how I did this here.
The Jewelry of the Kitchen
After I got the doors and drawers installed, it was time to add the hardware. This was so exciting because I felt like I could finally see the finish line! I had previously purchased knobs for the doors from deVOL Kitchens, so luckily I didn’t need to update the bulk of the hardware. However I had regular handles on the drawers and I really wasn’t loving how they felt or looked.
Brass Cup Pulls | Black Marble Vase | Vintage Skyscraper Pendant (similar)
For my drawers I opted to switch from handles to cup pulls and chose these pretty brass ones from EMTEK. I absolutely love how they look and what’s even better is how they feel. I kid you not, it feels luxurious to open my drawers now. I’m so thankful the brass finishes between the two brands work together (I definitely took a knob to a local showroom first just to make sure).
The island, countertop & pendant
When I bought my house in 2018, the kitchen had an island which I really loved. The previous owner had definitely cut the granite top too large, so the walkway between the island and cabinets always felt tight, but I loved the extra prep space the island provided. In 2021 I had a refrigerator leak which resulted in me getting all new flooring throughout the house (more on that here) and during that time the island had to be removed. In order to get it out of the house we had to break the granite countertop, so the island has been sitting in the garage topless all this time.
In my original design I had planned to use the original island and build around it to include a backside which would house a wine fridge and a microwave. However after measuring I realized I couldn’t fit both appliances without causing the same narrow walkway issue as the previous owner. Additionally the cost to pipe electrical through the floor was going to be exorbitant.
Walnut Butcher Block Countertop | Milk Glass Pendant | Marble Display Bowl | Drawer Pulls | Brass Switch Plate Covers | Totie Task Lamp
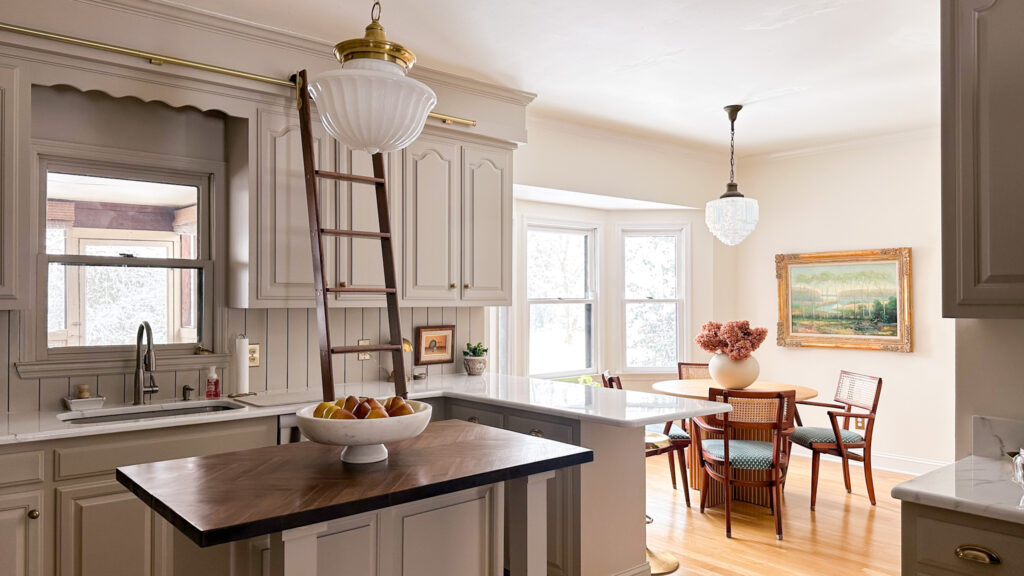
In the end, I opted to paint the original island the same color as the rest of the cabinetry (shout out to my mom who helped me with this over the holidays!) and found this beautiful butcher block countertop which fit perfectly on top. It has a pretty chevron pattern and the walnut wood pulls in the library ladder perfectly. Topped with a milk glass pendant and I couldn’t imagine this space any other way now.
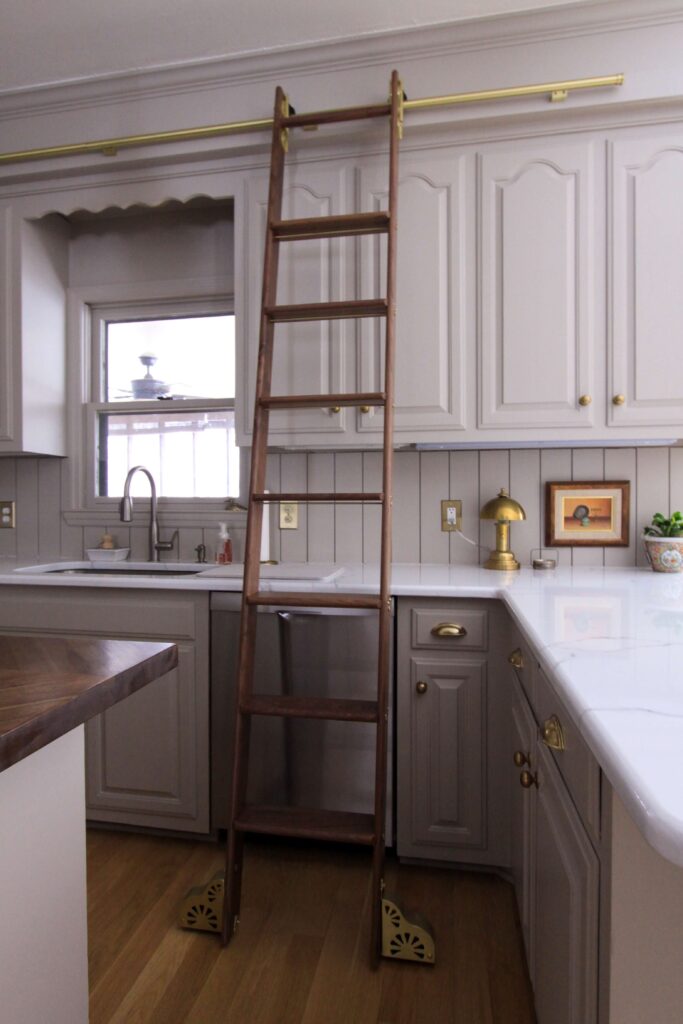
Speaking of Library Ladder…
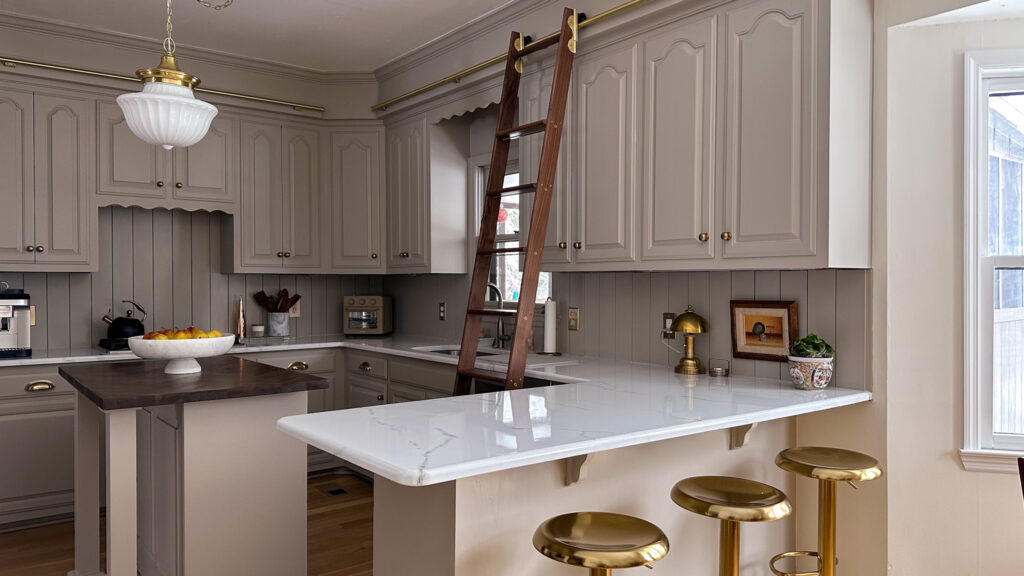
Yes that’s right. I installed the rolling library ladder of my dreams in the kitchen! This is by far my most favorite design element of the entire kitchen for a few reasons. First off, the library ladder adds so much functionality to my kitchen. I have 9′ ceilings and even though I’m 5’9″, I still can’t reach the top shelves without some assistance. Instead of dragging an ugly little step stool out each time I need something from the top shelf, now I can just roll this beauty to the cupboard I need to access.
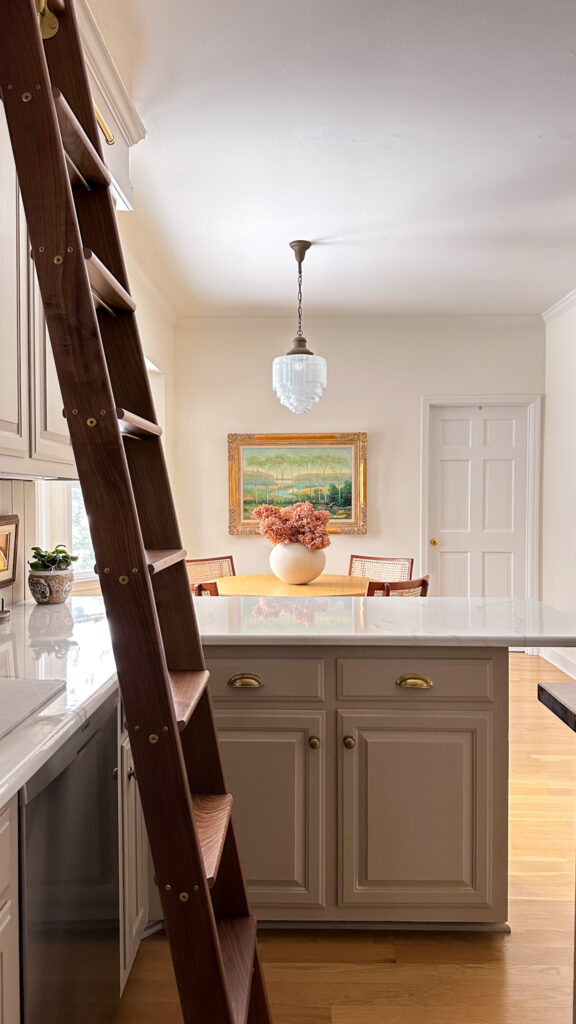
Another big reason I wanted to add a rolling library ladder to this space was to put my dated soffits to good use (that’s the big block above the cabinets). This is a classic 80’s / 90’s feature of cabinetry, but to me it’s wasted space. Attaching the rail to the soffits really gives them purpose, plus I think it makes the entire design look even better with a pop of brass.
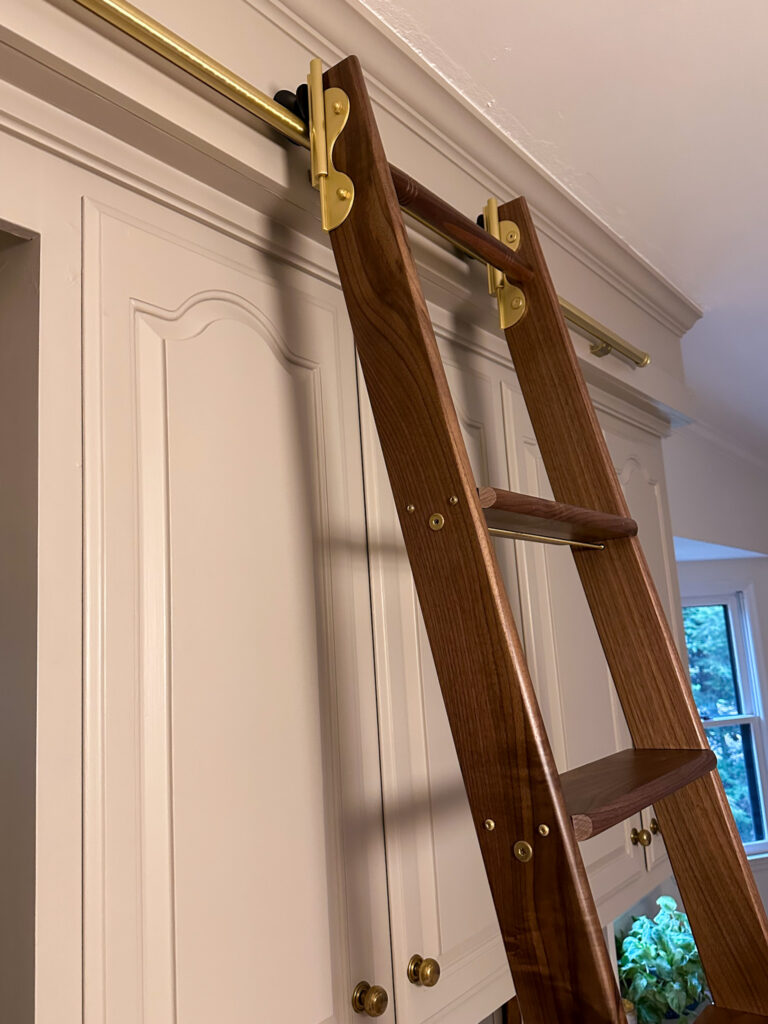
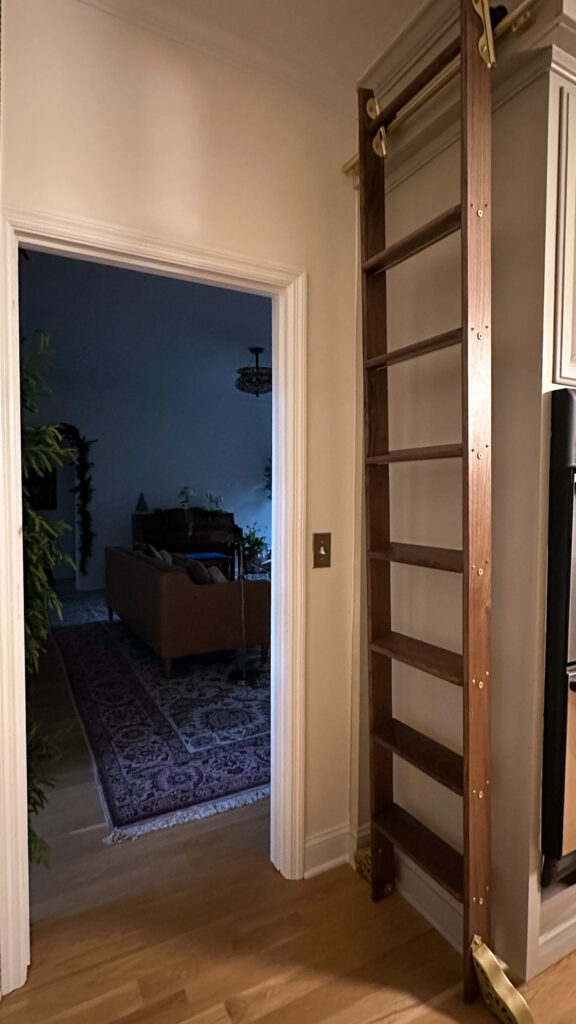
A close up of the rails attached to the soffit | The Rolling Library Ladder in stored position
And I think it goes without saying, but the library ladder is the WOW factor of my kitchen design. The warm walnut wood compliments the cabinet color and adds a touch of charm to the entire space. I know I had a lot of raised eyebrows when I shared I was adding an exposed ladder to my kitchen design, but I hope now you can see the vision. It turned out even better than I expected!
The Bells & Whistles
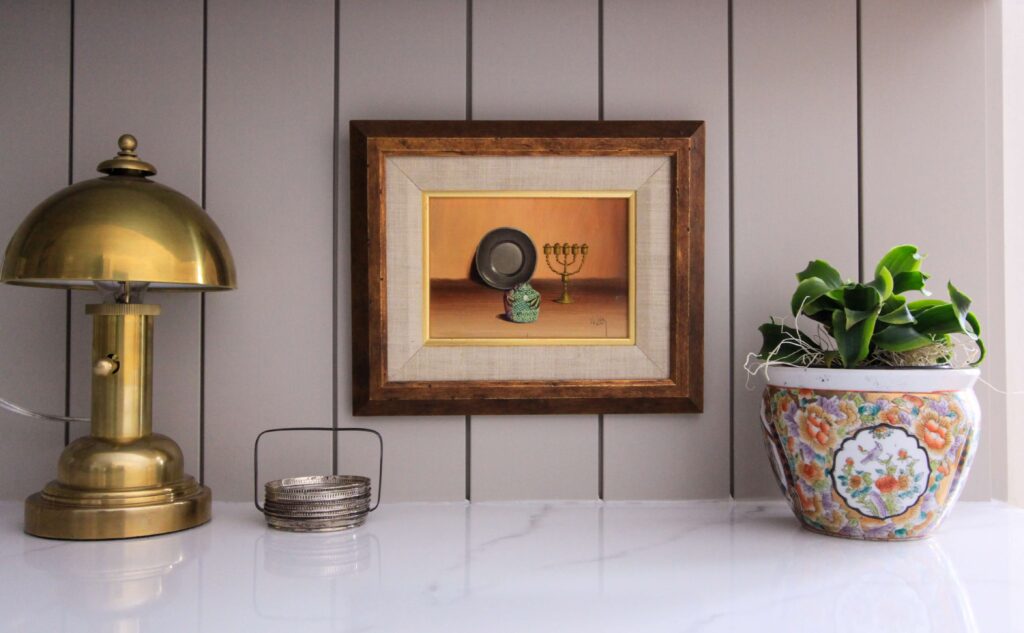
The finishing touches of the kitchen included updating the old white electrical covers to all brass covers and I love how they pop against the cabinetry color. I added three brass bar stools to the bar and I’m seriously obsessed with them! They’re adjustable, look beautiful and are so comfy! This is where I find myself sitting each day. And of course I had to add in some vintage touches like an original small oil painting and a planter I found at an estate sale, as well as my favorite little brass lamp. I turn it on every evening and I love the warm glow it exudes in the space.
Totie Task Lamp | Wood Paneling | Marble Countertop Kit
Budget Friendly Kitchen Renovation Recap
I still have a tiny punch list of things left to do like touch up some spots on the ceiling. I also have a drawer and new drawer face coming to install below the double oven. And eventually I hope to change out my faucet (I’m still on the hunt for the perfect option). But other than those few things, this budget friendly kitchen renovation is officially done!
Shop the Kitchen
Since the holidays, I’ve found myself wandering out into the kitchen and just sitting at the bar, marveling at the space. It’s warm and welcoming, and is almost begging you to spend time in it. The colors flow with the surrounding rooms, and it no longer feels like an afterthought. I really can’t believe it’s the same room, and even more so, I can’t believe I did it myself.
Catch Up on the Budget Friendly Kitchen Renovation:
One Room Challenge Kitchen Renovation – Week 1
One Room Challenge Kitchen Renovation – Week 2
One Room Challenge Kitchen Renovation – Week 3
One Room Challenge Kitchen Renovation – Week 4
One Room Challenge Kitchen Renovation – Week 5
One Room Challenge Kitchen Renovation – Week 6
One Room Challenge Kitchen Renovation – Week 7
Kitchen Sources:
Cabinet Paint Color: Stone Hearth by Benjamin Moore
Wall Color: Swiss Coffee by Behr


Perfect! Thanks for the shoutout!❤️
Your kitchen turned out so pretty! I love seeing the transformation of your remodel and how it completely changed the room. This gives me so much inspiration to finally do my own kitchen remodel. Thanks so much for sharing!
This is so incredibly kind! I really appreciate your words, and I’m so glad this could serve as inspiration for you! Good luck with your upcoming renovation!
I was interested to see your results (which are superb) as I am going to update my kitchen.
My feedback is I think the ladder and tiny island is OVERKILL. The kitchen is so beautiful it simply doesn’t need those two elements . They make the kitchen seem smaller and crampt . This is only seeing by pictures it could be in real life you have more space but I still think you are using ideas for their sake not for yours.