


If you’ve been following along, you’ll recall that I opted to complete my new hardwood flooring installation in phases. In phase one I knocked out the downstairs flooring first, which is where the water leak happened (it was kinda urgent). Now that we have that out of the way, we can focus on the staircase and upstairs bedrooms. While I’d already made the core decisions when it came to the flooring (wood type, plank width, stain) I still had a lot to nail down when it came to the staircase design. Honestly, it was more than I ever would have expected – I already had a staircase so what was there to decide? Wait for it.
Staircase Terminology 101
Most of the staircase terminology was new to me, so to help you follow along I’m going to break down some key terms along with a diagram.
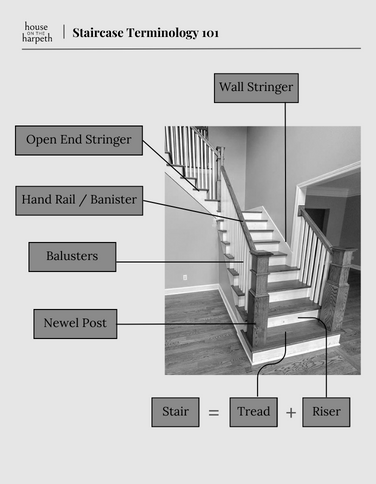
- Riser: this is the back of the stair, and what you might stub your toe on when going up the steps. Technically: the riser is the vertical component of the stair that provides support to the tread.
- Tread: the tread is what we step on (i.e. what we tread on). Technically: the tread is an upper flat surface or a horizontal portion of a step A tread + a riser = a step
- Newel Post: these are the posts at the top and bottom of most staircases. They support and connect the handrail.
- Hand Rail: Sometimes also referred to as a banister, this is what we try to slide down when we’re kids. Technically: the piece of metal or wood that you hold on to when going up and down the stairs, which provides both support and safety.
- Baluster: these are the wood or metal vertical pieces that connect the handrail to the bottom of the staircase (which is called a stringer – see next).
- Stringer: These are angled pieces of wood that support the steps in a staircase. There is always a wall stringer, which is next to the wall and then an open or closed stringer for the other side of the staircase.
Staircase Design Decisions….
The biggest decisions I needed to make for the staircase design came down to a handful of components but ones I didn’t take lightly. They were: newel post design, riser type, baluster type, and open vs closed stringer. Follow along as I break it down from easiest to hardest, along with my design process.
Design Decision #1: Riser type
When it came to the risers, I needed to decide if I wanted to continue the white oak the entire flight of stairs, or if I wanted to break it up with painted white risers. This was a pretty simple decision for me because I felt having continuous white oak would be too much wood, and a white riser would help break things up. Winner: white risers.
Design Decision #2: Newel Post
The house is a traditional style home and I felt bringing in a large newel post would work for both the design style of the house as well as the scale of the entryway which has 20 foot high ceilings. I have a small balcony at the top of the stairs, which would require two additional newel posts. I had the option to vary the sizes of these posts, but I decided to keep all the newel posts large and chunky to allow for design consistency. Winner: chunky newel posts.
Design Decision #3: Balusters
I knew I wanted black balusters. I love the contrast they bring to the table with the white oak floors. The unknown part that I struggled with was what size – there were thick balusters and thin balusters. Due to code, I needed to have three balusters per step (so children can’t put their heads through the balusters). My previous staircase was not done to code, so I had a hard time visualizing if the wider balusters I wanted were going to look too busy due to needing so many per step. The other option was to go with a thinner baluster, however I was worried that would create a modern feel which is what I didn’t want. Winner: thick black metal balusters.
Design Decision #4: Stringer – Open vs Closed
This was the hardest decision for me and I went back and forth multiple times. My previous staircase had a closed stringer. That meant the balusters were drilled into the angled piece of wood that was placed on top of the tread.
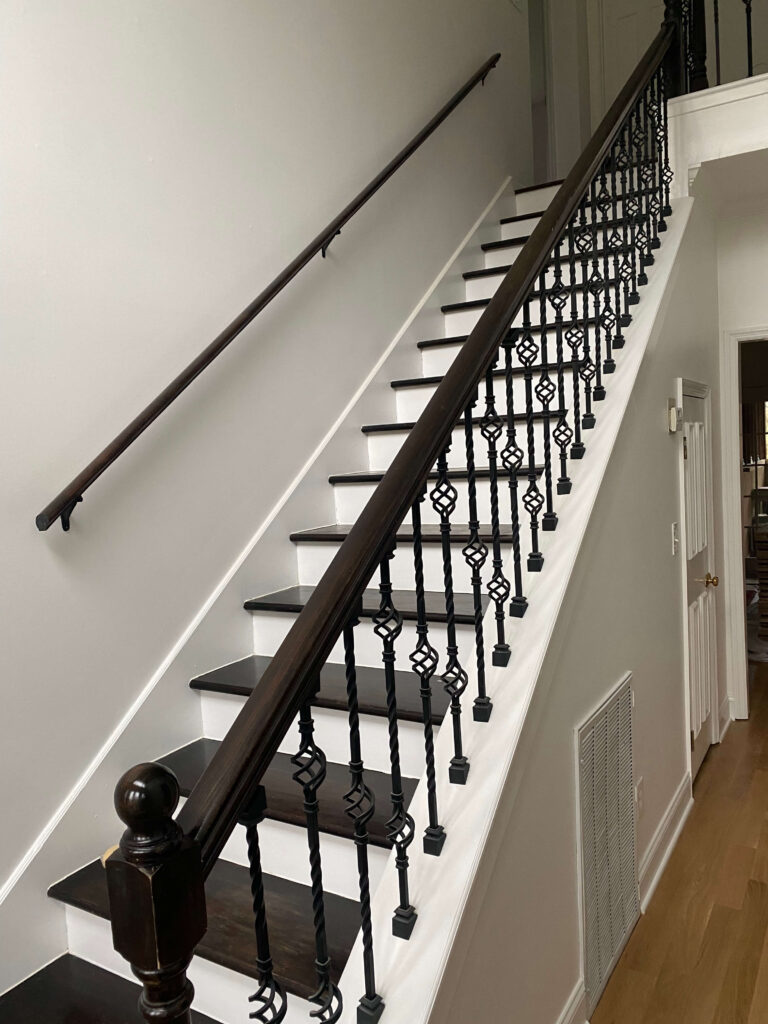
I had planned on keeping the stringer closed, however after learning I’d need to keep the existing stringer in order to do so, I opted to open it up. With so many DIY issues from the previous owners, I wanted to ensure I was getting a fresh start all the way around. Winner: Open Stringer
Conclusion
This project gave me a run for my money! The staircase is the first thing you see upon entering the front door and first impressions are everything. While I’m sure it sounds silly to most, I wrestled with the staircase design decisions for weeks, mostly because I wanted to ensure I was staying true to the style of the home. Ultimately I want this first impression to be a memorable one, and a proper introduction of what’s to come upon visiting my home.


You had so many decisions to make at once and obviously did your homework to come up with the right decision.