


If you’ve been around for a minute, you already know this is a long time coming. I’ve been talking about renovating my laundry room for at least two years, and for a while, I was almost afraid to say it out loud in case I jinxed it. But it’s happening. Today I’m pulling back the curtain on my laundry room design plans, and I honestly can’t believe I’m finally typing those words.
Good Bones (Just… Not Much Else)
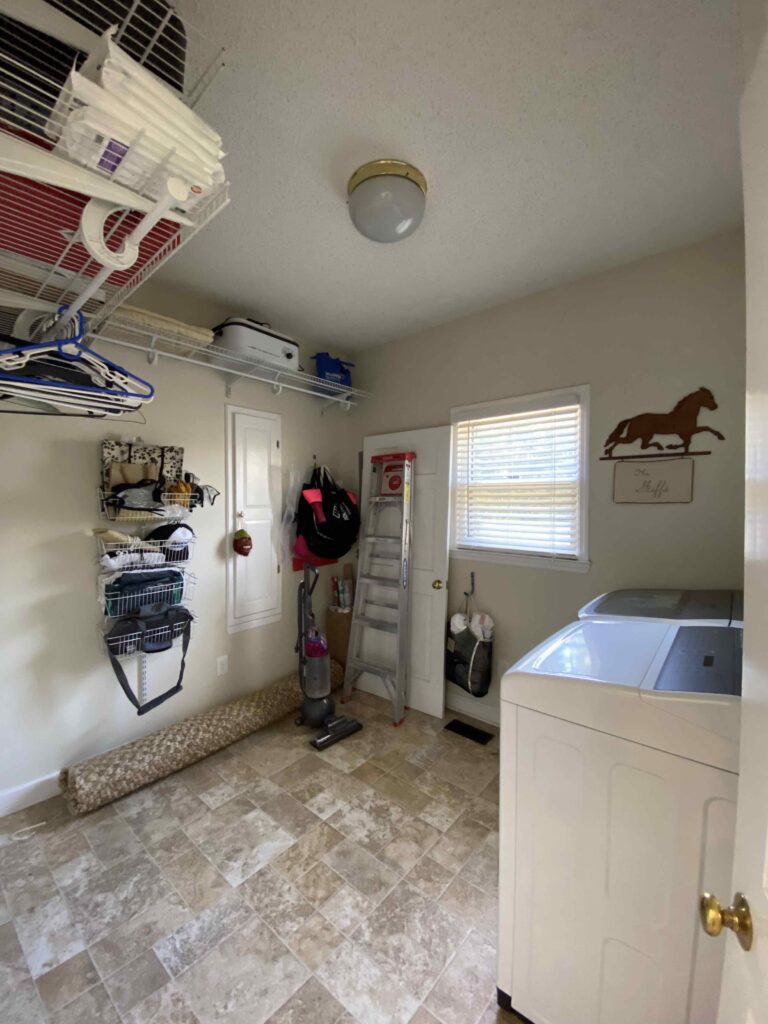
The laundry room is a great footprint, but doesn’t have much else to offer.
When I bought my house in 2018, the laundry room was (and still is) the ugliest room in the house. Wire shelving, old linoleum that looks dirty no matter how many times you clean it, an exposed electrical panel, beat-up baseboards. The works.
But what I saw when I walked in for the first time wasn’t any of that. I saw space. After years of doing laundry in a closet barely big enough to fit myself, this room felt like a luxury. It’s a generous 8’4″ x 9’9″, and that square footage has always felt full of potential.
The problem? I couldn’t figure out what to do with it. Because this room isn’t just a laundry room — it’s my command center. It houses cleaning supplies, paper goods, beach towels, wrapping paper, and serves as the drop zone for every package coming in and going out. Whatever I designed had to work hard.
So for a couple of years I did… the minimum. I scraped the popcorn ceiling, laid down peel-and-stick marble tiles, and painted the walls with leftover paint. It helped a little. But without any real organizational systems in place, it stayed beautifully chaotic.
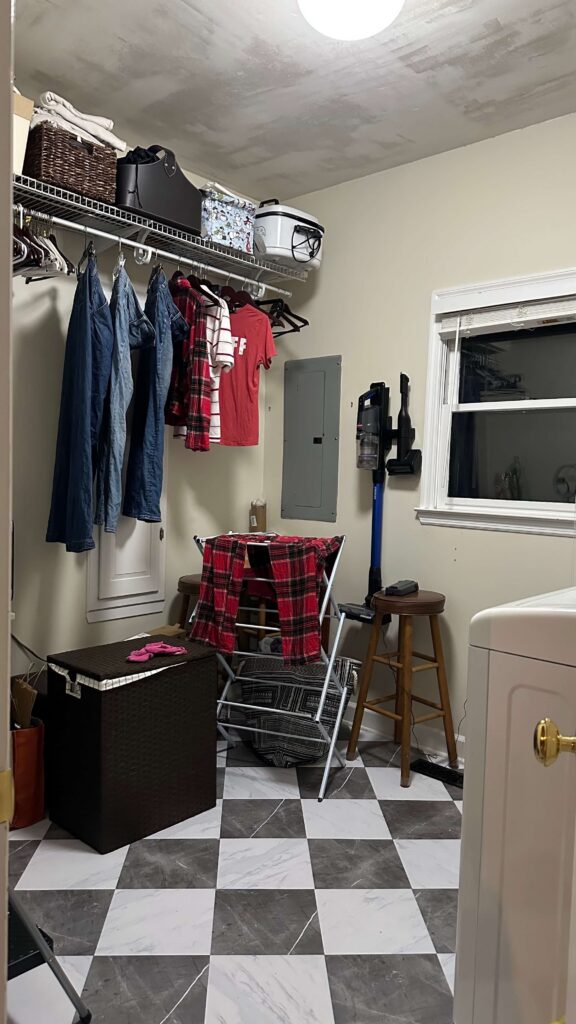
A truly unfiltered photo for you. This is the worst room in the house.
Starting with Function, Not Aesthetics
My usual approach to a room is to lead with the fun stuff: wallpaper, paint, trim, decor. This room forced me to flip that completely.
The back wall is generous, and even with an ironing board awkwardly positioned two-thirds of the way down it (a stud placement situation I’ve never loved), I kept coming back to the same idea: floor-to-ceiling cabinetry. I needed somewhere to fold laundry, store the random odds and ends that currently live on the floor, and create a real solution for incoming and outgoing packages that have been cluttering up my kitchen.
I also wanted to build in a charging station. Not necessarily for phones, but for the rechargeable lamps, speakers, and miscellaneous things that always seem to stack up with nowhere to go. I think almost everyone can relate to this.
The Feature I Didn’t Know I Needed
Here’s where the design plans took an unexpected turn.
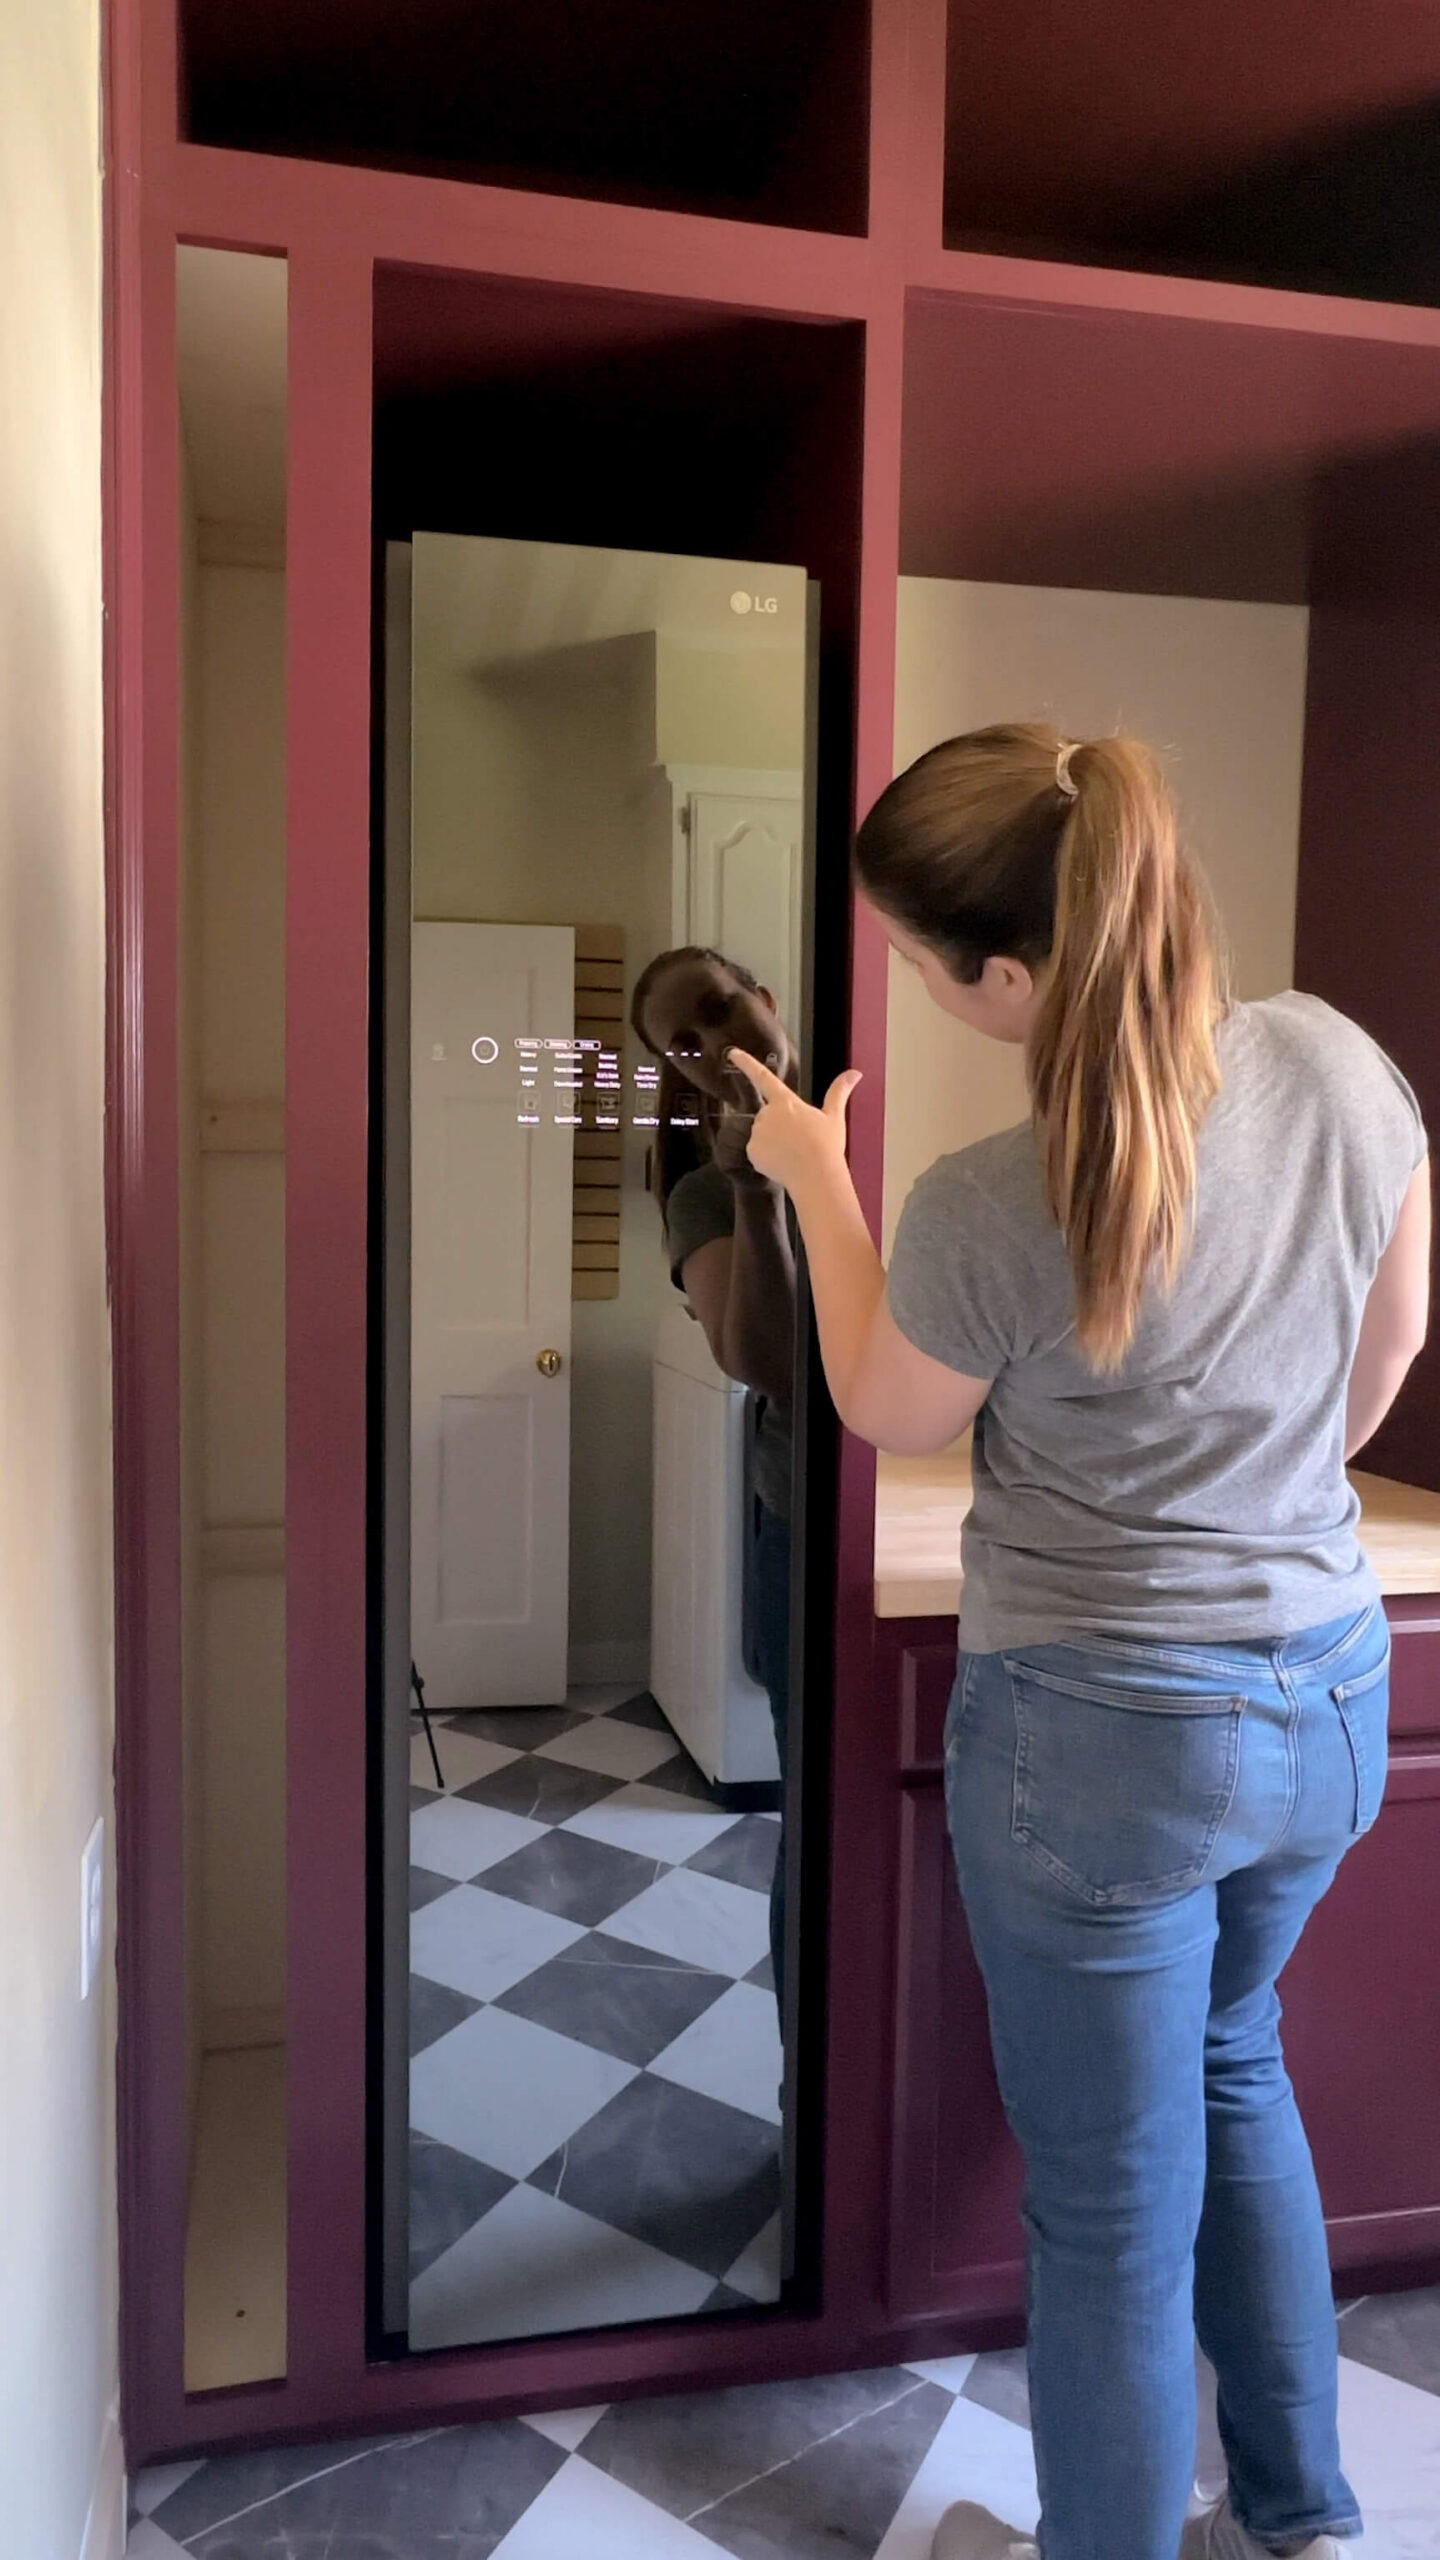
A few months ago I was listening to one of my favorite design podcasts (Dear Alice) and they started talking about building out dream dressing rooms. They kept mentioning a “styler” — an at-home dry cleaning machine. I had no idea something like this even existed. I paused the episode, opened my Notes app (where I keep a running list of every design idea I’ve ever had), made a note and immediately started researching.
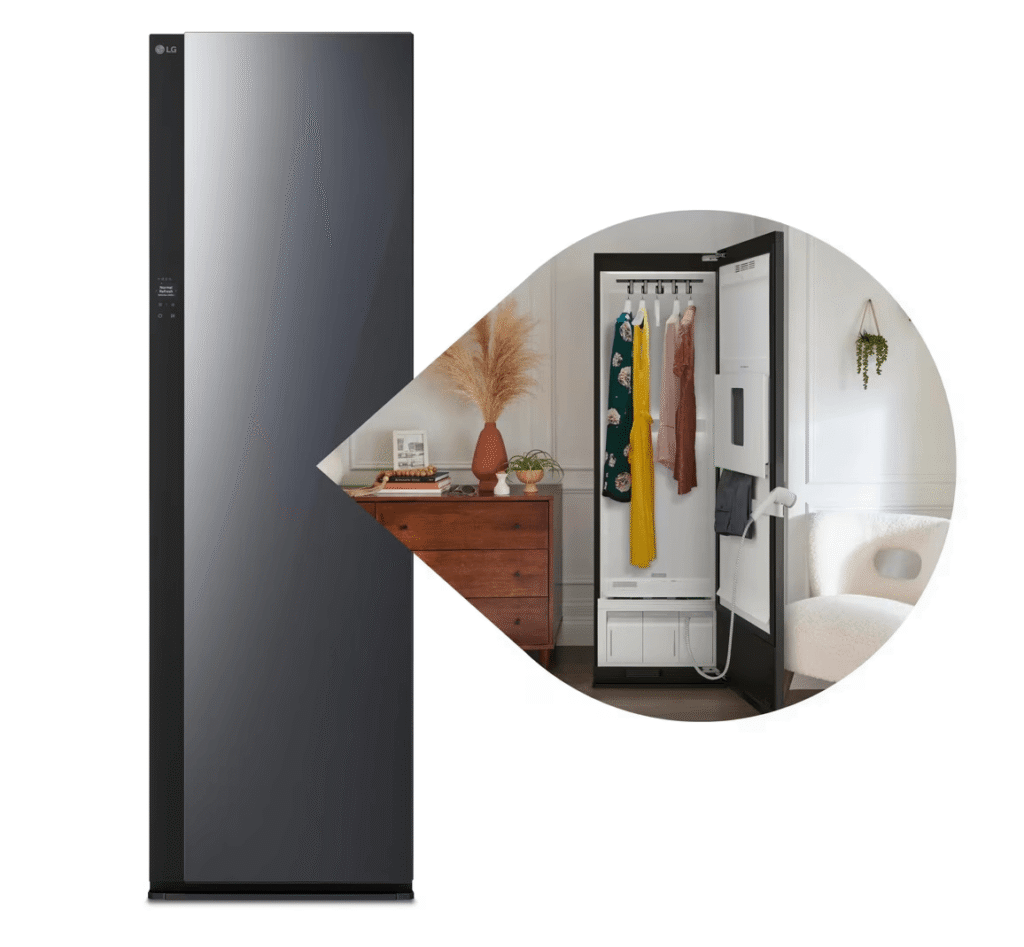
This at home dry cleaning machine only requires an electrical hook-up and you fill the water vessel as needed, making it incredibly versatile!
The LG Styler is essentially a slim, mirrored steam closet. It holds up to three garments, has a pants-creasing function, and uses steam to sanitize and refresh clothing exactly like a dry cleaner would. It only needs a standard outlet, and the water reservoir slides out like a tray, so there’s no plumbing hookup required.
Once I saw it, I knew it had to be part of the laundry room design plans.
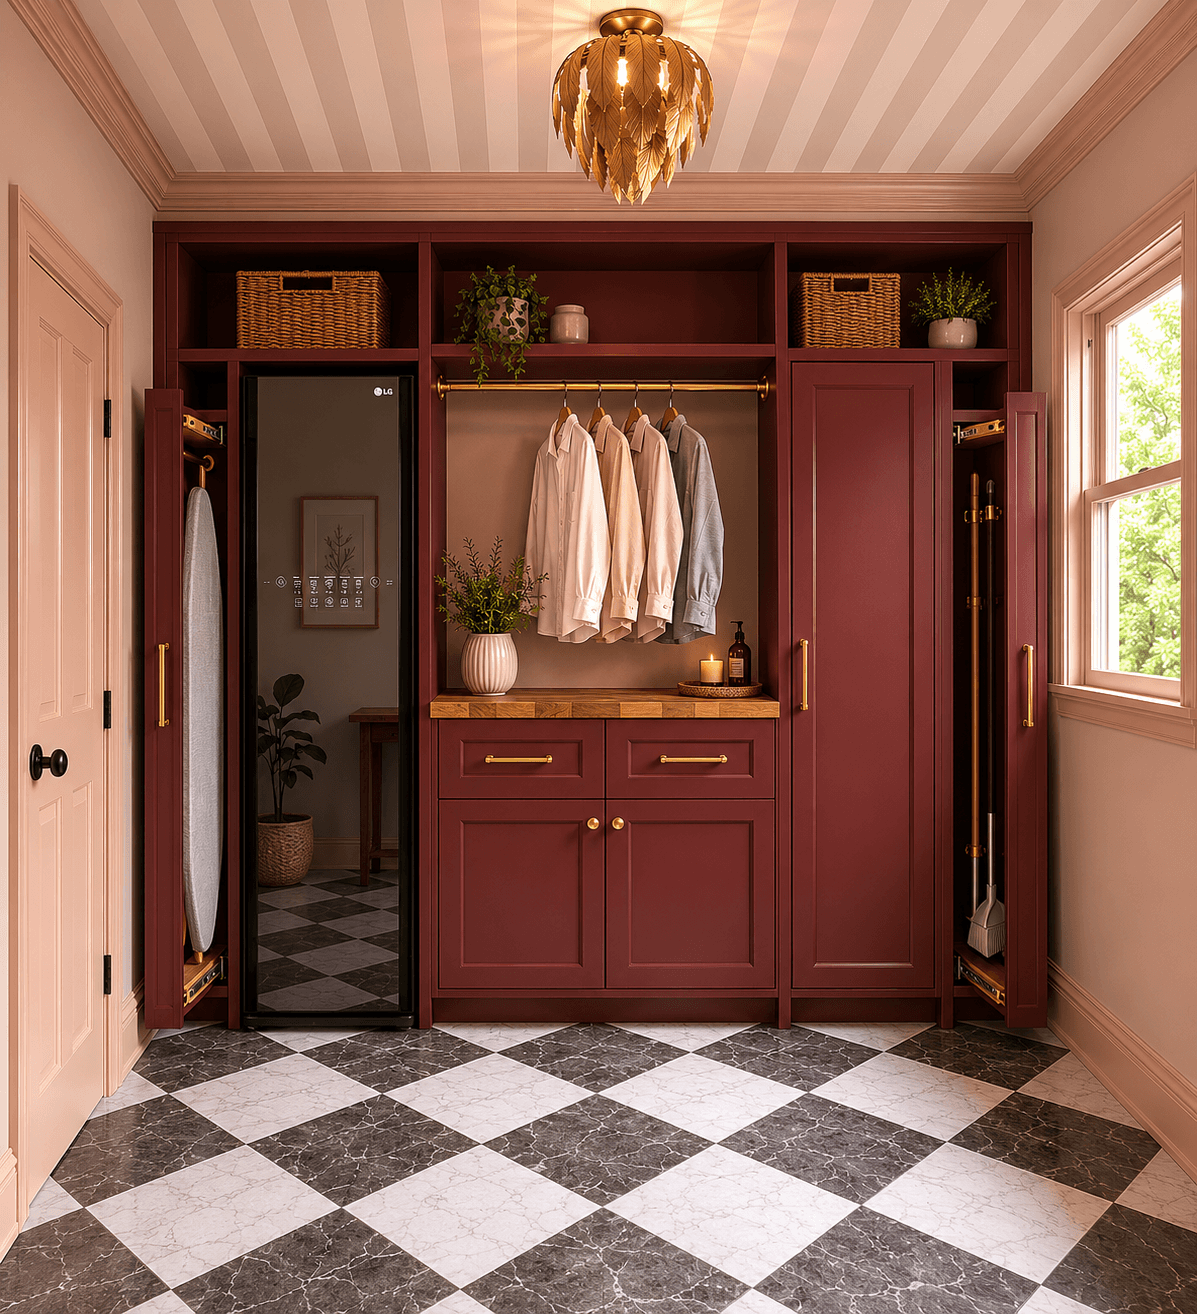
The Full Laundry Room Design Plan
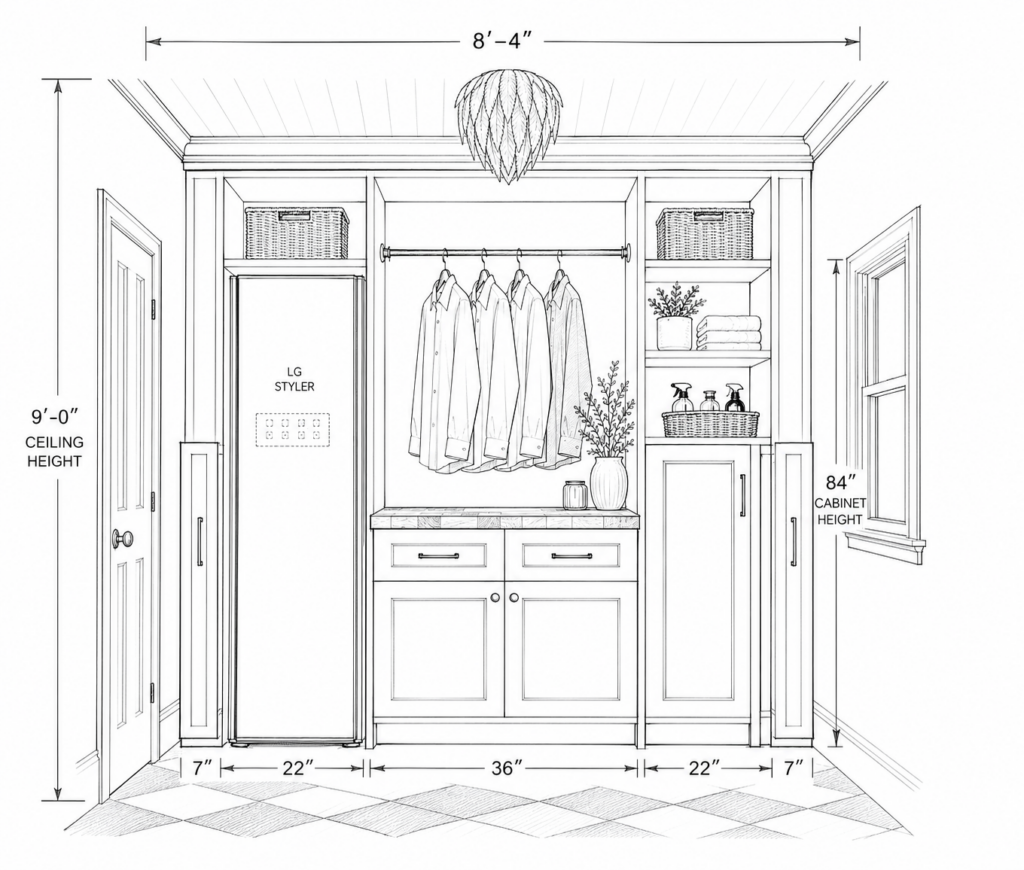
With function mapped out and the LG Styler added to the equation, I started measuring and sketching. And I made one more decision: I’m building the cabinets myself.
All of my woodworking so far has been two-dimensional: box molding, wainscoting, crown molding. Building cabinets is a new skill, but it’s been on my list, and there’s no time like a full room renovation to figure it out.
Here’s what I’m planning:
- Floor-to-ceiling cabinetry spanning the entire back wall, approximately 8 feet long
- An open cabinet bay sized specifically to house the LG Styler
- A base cabinet with both doors and drawers, topped with a butcher block counter for folding, staging packages, and general life admin
- Tall, narrow pull-out cabinets to hide the brooms, mops, and scrub brushes that have never had a proper home
- A hidden ironing board solution built into the cabinetry
- Stacked upper cabinets finished with crown molding that runs the full perimeter of the room
Floor to ceiling built-ins will solve for organization, and will also help me turn this room into more of a command center.
Color, Pattern, and the Pivot That Changed Everything
I spent a long time overthinking the aesthetic. I always imagined this room wallpapered floor to ceiling, and I kept getting stuck trying to find the perfect pattern.
One night I decided to stop shopping for wallpaper and start with a feeling instead. I asked myself: how do I want to feel when I walk in here? The answer was warm, romantic, and calm.
That reframe changed everything.
I’ve been wanting to bring pink into the house, and I’ve also been holding onto a deep burgundy that I haven’t found the right room for yet. Color blocking the two felt like the answer and to scratch the wallpaper itch, I’m adding a striped pattern to the ceiling. Paired with the checkered tile floor that’s already down, it’ll be a fun visual bookend from top to bottom.

It took me a long time to get to this design but I couldn’t be happier with the direction!
The room also needs to thread through to the kitchen and breakfast nook, which are the adjoining spaces so the warmth of the palette will carry that connection naturally.
What’s Next
The LG Styler is scheduled to arrive June 19th, which means this project is moving fast! After clearing out the room and demoing the baseboards, I’ll be getting straight to work on the cabinets and I’ll be documenting every step. Make sure you’re following along on socials so you don’t miss a beat!
This room has been neglected long enough. I can’t wait to finally give it the love it deserves and selfishly, I’m really ready for a command center that actually works.
Related:
DIY Home Renovation Project Plans for 2026
Wallpapering Tips for Beginners
How to Design & Install Picture Frame Molding (with chair rail)